I've recently been thinking about having a tapas-style dinner party, where I make a whole bunch of appetizer selections instead of a main dish. I was collecting recipe ideas (although I haven't planned the actual party...) when I came across this one in The Food52 Cookbook. As soon as I saw the recipe, I decided that there was no reason to wait for a party when I could make these on a random Sunday evening instead. I'm glad I made that decision, because it meant that Andrew and I didn't have to share! These olives were awesome - crunchy and salty and cheesy, really the perfect party snack (even if it's just a party of two).
Showing posts with label snacks. Show all posts
Showing posts with label snacks. Show all posts
Monday, March 11, 2013
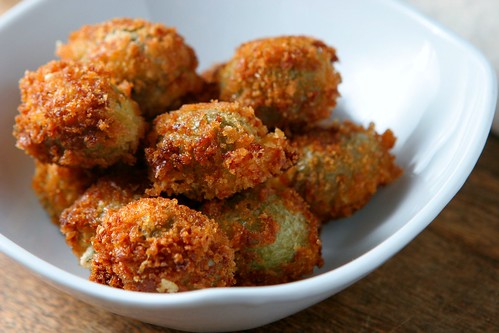
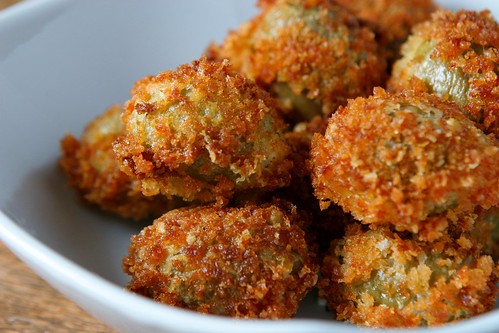
Fried olives stuffed with goat cheese
I've recently been thinking about having a tapas-style dinner party, where I make a whole bunch of appetizer selections instead of a main dish. I was collecting recipe ideas (although I haven't planned the actual party...) when I came across this one in The Food52 Cookbook. As soon as I saw the recipe, I decided that there was no reason to wait for a party when I could make these on a random Sunday evening instead. I'm glad I made that decision, because it meant that Andrew and I didn't have to share! These olives were awesome - crunchy and salty and cheesy, really the perfect party snack (even if it's just a party of two).
Labels:
goat cheese,
hors d'oeuvres,
olives,
party food,
snacks
Monday, May 7, 2012
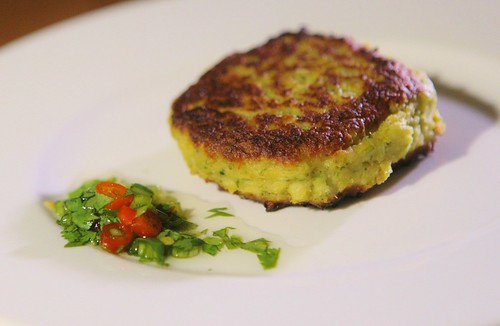
Thai tempeh cakes
You may remember that in the past I have been lukewarm about tempeh, not really sure if I liked it or not. Well these tempeh cakes have convinced me once and for all that I do indeed enjoy tempeh. For me, it's all about the preparation - I find that tempeh is best crumbled or mashed into a patty and combined with strong flavors. This recipe is the perfect example, the tempeh is mixed with lemongrass, garlic, ginger, and cilantro and the cakes are served with a spicy-sweet dipping sauce...sounds pretty good, huh? I don't think I've ever had an appetizer like this before, and I really enjoyed it. I know that some of my readers have had bad experiences with tempeh - if you want to give it another chance, you should definitely try this!
Labels:
Asian,
hors d'oeuvres,
quick,
side dishes,
snacks,
tempeh,
thai
Friday, May 4, 2012
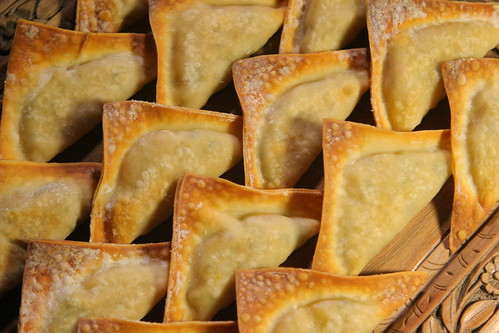
Green curry wontons
When I was home visiting my parents, one of our family friends gave me a Thai cookbook as part of a graduation gift. I was pretty excited about this, since I love Thai food but don't know much about Thai cooking. As I was flipping through the book, I found myself especially drawn to the appetizer section, and decided to try a couple of the recipes this week. These green curry wontons were the first thing I made. They have a flavorful potato and vegetable filling, kind of like a Thai twist on samosas. I decided to bake them instead of frying, which ended up being a good decision - the wontons ended up perfectly crispy at the edges but weren't greasy at all. These were pretty easy to make, and I could definitely imagine serving something like this next time I have a party. With the success of this recipe, I think it's safe to say that you'll be seeing more Thai recipes on this blog as I experiment with more recipes from my new book!
Labels:
Asian,
chiles,
corn,
hors d'oeuvres,
party food,
peas,
potatoes,
snacks,
thai
Thursday, March 29, 2012
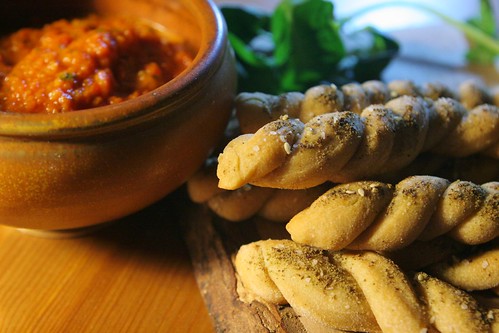
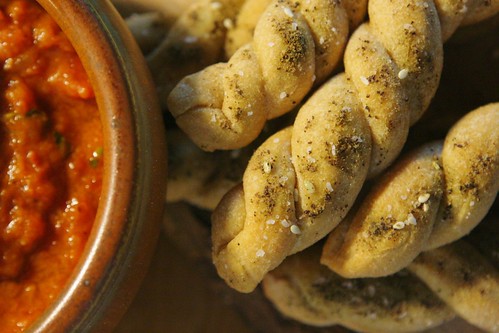
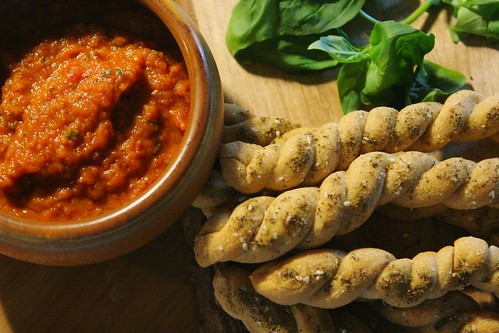
Za'atar breadsticks with Middle Eastern tomato sauce
Okay, so it seems like I am the last food blogger in the world to join Pinterest. I think I'm more of a verbal than visual person, so I prefer browsing recipes in cookbooks or recipe sites rather than looking at pictures alone. But I finally joined Pinterest and made my first boards last week, and although I'm not totally obsessed, it sure is fun! I've especially enjoyed collecting pictures of pretty desserts, which lets me imagine that I might become a master of cookie/cake decorating in the future (considering how rarely I make anything with frosting, this is highly unlikely). Of course, I've also been pinning pictures of regular meals, and one of these inspired this recipe. While I was browsing pizza pictures, I came across one of za'atar pizza, which I thought was a cool idea. Za'atar is a Middle Eastern spice blend that is often mixed with olive oil as a dip for bread. I decided to take this idea and make za'atar-dusted breadsticks, with a jazzed up tomato sauce for dipping. Making the tomato sauce also gave me an opportunity to use another traditional Middle Eastern ingredient that I just bought for the first time - pomegranate molasses. I'm not going to make any claims as to whether the tomato sauce I made is anything like an authentic Middle Eastern recipe. I'll just say that it's tasty, a little sweeter, spicier, and more tart than the tomato sauce you may be used to, with a fruity undertone from the pomegranate molasses. The sauce works well with the spices on the breadsticks, and this dish makes a fun appetizer. Now if you'll excuse me, I have some more pictures to pin!
Labels:
4SoF original,
bread,
hors d'oeuvres,
lemon,
Middle Eastern,
pizza,
pomegranate molasses,
side dishes,
snacks,
tomatoes,
za'atar
Wednesday, March 28, 2012
Monster cookies
I've been holding out on you. I made these cookies for my thesis defense party several weeks ago and haven't gotten around to sharing the recipe until now. I wanted to space out the dessert recipes a bit, but it's been a month since the last one, so I think it's about time for some sweets! The recipe for these cookies came from the Baked cookbook. I had never heard of monster cookies before I came across this recipe, but apparently they are well known in certain areas. If you are unfamiliar with them, monster cookies are peanut butter oatmeal cookies with chocolate chips and M&Ms. According to the authors of the recipe, they are called monster cookies because they are the Frankenstein's monster of the cookie world - a mashup of different components. (Also, I got 60 largeish cookies when I made this, but the recipe says it yields 36, so the cookies that they serve at the Baked shop must be pretty monstrous in size). Now, I think oatmeal chocolate chip cookies beat oatmeal raisin every time, and I love peanut butter, so mixing it all together sounded great to me!
To be honest, I wasn't thrilled with these cookies when I first made them. They were good, but not amazing. But then I stuck a bunch of leftover cookies in the freezer after the party and ate them over the following weeks, microwaving them briefly to thaw them. Well, microwaving did the trick and made me love these - it softened them up slightly and made them a little warm, but left the chocolate chips and M&Ms solid, just the way I like it. Perfect with a glass of milk as a snack or dessert. Too bad I finished the batch - I could really go for one right now...
To be honest, I wasn't thrilled with these cookies when I first made them. They were good, but not amazing. But then I stuck a bunch of leftover cookies in the freezer after the party and ate them over the following weeks, microwaving them briefly to thaw them. Well, microwaving did the trick and made me love these - it softened them up slightly and made them a little warm, but left the chocolate chips and M&Ms solid, just the way I like it. Perfect with a glass of milk as a snack or dessert. Too bad I finished the batch - I could really go for one right now...
Labels:
chocolate,
cookies,
dessert,
oats,
party food,
peanut butter,
snacks
Tuesday, March 20, 2012
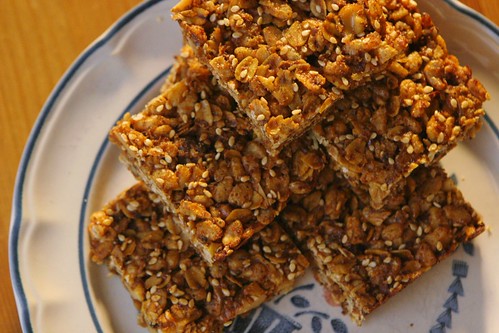
Granola bars
This past Sunday, I ran my first half marathon. A year ago, I never could have imagined that I was capable of running 13.1 miles. I would have told you that half marathons are for crazy people, because no sane person would ever run that far by choice. But now...I guess I've become one of those crazy people! I started running last May because I wanted to do cardio exercise more regularly and improve my fitness for health purposes. I slowly built up my mileage over several months and found that I really enjoyed long runs, even in sub-freezing temperatures. I eventually decided to run the Half of Quincy and couldn't have asked for a better experience for my first half marathon. The weather on Sunday was gorgeous, and the first few miles of the race were along the ocean, which I loved. My training paid off and I felt great on race day, although I'll admit that miles 11-13 were very challenging, both mentally and physically. My goals for the race were pretty modest, since I'm a new runner - I wanted to run/jog the whole thing without walking breaks, and I wanted to finish with a smile on my face. I'm proud to report that I accomplished both those things, and I already can't wait to do it again!
While I was training, I made a conscious effort to refuel properly after running. I wasn't trying to lose weight, so I tried to replace the calories I was burning by adding some healthy snacks to my routine. One of my go-to snacks was granola bars. I tend to find that packaged granola bars are often too sweet, too dry, or have some components (like certain nuts or fruits) that I don't care for. So it seemed obvious that I should develop a recipe of my own that is suited to my particular tastes! This granola bar recipe went through a couple iterations - the first version I made had nice flavor but the texture was too soft and the bars didn't hold together well. I made several changes and finally ended up with this version, which I love. The texture is chewy rather than hard, but the components of the bars still have good crunch. They are full of ingredients that you can feel good about, and have really great flavor with just the right amount of sweetness. I'll definitely be keeping a supply of these bars around as I train for my next race!
Labels:
4SoF original,
bars,
nuts,
oats,
raisins,
sesame seeds,
snacks,
walnuts
Thursday, March 8, 2012
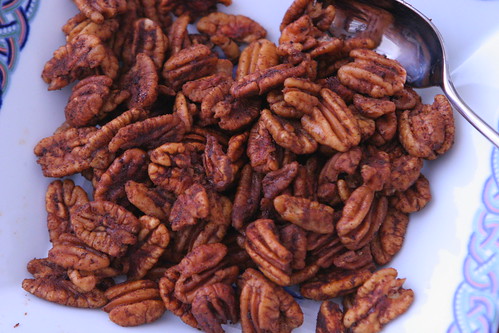
Spiced pecans with rum glaze
It's no secret that I love cookbooks by the late Gourmet magazine, given how often I cook from The Gourmet Cookbook and Gourmet Today. In addition to those books, I also own copies of the 1979 edition of The Gourmet Cookbook, Volumes I and II (these were given to me at my bridal shower - such a thoughtful gift!), as well as The Gourmet Cookie Book, The Gourmet Menu Cookbook (1984), and The Best of Gourmet (2005 and 2006). I love looking through the books from different times and seeing how recipe writing, cooking styles, and photography have developed over the years.
The Gourmet Menu Cookbook in particular has some text that is really funny to read now because of how dated it is. For example, in the section about cocktail parties:
The Gourmet Menu Cookbook in particular has some text that is really funny to read now because of how dated it is. For example, in the section about cocktail parties:
"At a small party in a servantless house, guests can usually be counted on to offer assistance by helping themselves...Food that can be served from trays and eaten with the fingers is best for a small party. To attempt to manage a plate, a glass, and a cigarette all at once can prove most uncomfortable."Making sure the guests can manage their cigarettes is not usually the biggest concern for a host/hostess these days, but one thing that hasn't changed is the fact that roasted/spiced nuts are always a good party snack. I'm sure the recipes by Gourmet are quite good, but my go-to recipe comes from America's Test Kitchen. The pecans are perfectly spiced, and the rum glaze will keep you going back for more - I certainly hope this recipe never goes out of style!
Labels:
hors d'oeuvres,
nuts,
party food,
pecans,
snacks
Sunday, May 22, 2011
Whole wheat chocolate chip cookies
A couple weeks ago, Andrew and I went to the New England Mobile Book Fair, which is an awesome discount book store. The cookbook section is the biggest I have ever seen, so naturally I was in heaven. Especially when I found out that some of the cookbooks were on sale for 40% off. I came home with the Flour bakery cookbook, Dorie Greenspan's Around My French Table, and Kim Boyce's Good to the Grain (believe me, it took a lot of effort to pare down my selections to just those three). I'll be doing posts about all these books as I try them out, but for today, I'm focusing on Good to the Grain. I have heard a lot about this book, which has earned rave reviews from some of my favorite food bloggers. The book focuses on baking with whole grain flours, which is a topic that gets very little attention in other cookbooks. Different grains have a great variety of flavors and textures that can add a lot of baked goods, as long as the recipes are created with care (you can't really substitute different flours without knowing their properties really well). The recipes in Good to the Grain are supposed to be fantastic, and I'm excited to finally have a copy of the book.
Yesterday I baked a batch of the whole wheat chocolate chip cookies. I had a craving for sweets and figured I'd see how the whole wheat cookies compared to my favorite chocolate chip cookie recipe. This is the only cookie recipe I've tried that uses cold butter for creaming with the sugar instead of room temperature. I'm sure there's a good reason for that, though I don't know what it is. But it doesn't really matter - the cookies are great! They are sweet and chocolatey, nice and chewy in the middle but crisp at the edges, just the way I like. You should make these, and not because they are made with whole wheat. They're just really good chocolate chip cookies.
Whole wheat chocolate chip cookies
Adapted from Good to the Grain
Makes about 22 cookies
3 cups whole wheat flour
1 1/2 tsp baking powder
1 tsp baking soda
1 1/2 tsp kosher salt
2 sticks (8 ounces) cold unsalted butter, cut into 1/2-inch pieces
1 cup dark brown sugar
1 cup white sugar
2 eggs
2 tsp vanilla extract
8 ounces good-quality bittersweet chocolate, roughly chopped into small (1/4 - 1/2-inch) pieces
Place racks in the upper and lower thirds of the oven and preheat to 350 deg F. Line two baking sheets with parchment paper.
Sift flour, baking powder, baking soda, and salt into a large bowl. If there are bits of grain or salt that remain in the sifter at the end, pour those into the bowl as well. Using a stand mixer with the paddle attachment, cream the butter and sugars together at low speed just until they are blended, about 2 minutes. Add eggs one at a time and mix each until they are combined. Add vanilla and mix until combined. Add the flour mixture and mix until just combined, about 30 seconds. Scrape down the bowl and add all of the chocolate. Mix until chocolate chunks are evenly distributed throughout the dough and then transfer the dough onto a work surface. Use your hands to mix and make sure all ingredients are fully incorporated (sometimes the stand mixer doesn't completely mix the stuff at the bottom of the bowl).
Scoop balls of dough (about 3 tbs in size) onto the baking sheet, with about 3 inches between them (you'll fit about 6 on each sheet). Bake cookies for 16-20 minutes, rotating pans top to bottom and front to back halfway through, until the cookies are evenly golden brown. Transfer cookies to a rack to cool and repeat with remaining dough.
Note: If you want to save some cookie dough to bake later, you can scoop it out and refrigerate the balls of dough for about a week (wrapped in plastic). You can also freeze the balls of dough on a tray until firm and then transfer them to a freezer bag.
Labels:
chocolate,
cookies,
dessert,
snacks,
whole wheat
Wednesday, March 30, 2011
Fried chickpeas
Over the weekend, Andrew and I went to one of the closing Borders stores. The cookbook section was pretty cleaned out, but I managed to snag a copy of Melissa Clark's In the Kitchen With a Good Appetite. I had been hearing great things about this book on other food blogs and I'm so glad I came across a copy on sale. The book is a delight to read! Each recipe is preceded by a short essay with anecdotes from Clark's life, describing the inspiration for the dishes and the ways the recipes have evolved. I haven't been able to put it down - I've actually been taking it with me on my commute to work so that I can read it on the bus.
I've bookmarked many recipes to try out, but these fried chickpeas beat out all the others for me to try first. Andrew and I have been doing some dinners recently "tapas-style", making several small dishes in a night. It's a great way to use up random ingredients that need to be finished, especially if there isn't enough of the ingredient for it to be part of a larger dish (e.g. half a tomato, a couple of small corn tortillas, half cup of cooked spinach). These chickpeas were the perfect addition to one of those tapas-style meals. They are delicious and addictive, salty, crunchy, and flavorful. They would make a fabulous party snack - I imagine that they would pair perfectly with beer. Be careful though - make sure you have others around to help eat them, or you will finish them yourself before you know it!
Fried chickpeas
Adapted from In the Kitchen With a Good Appetite
I tossed the chickpeas with a bit of chickpea flour after drying. This step is optional, but it does give the chickpeas a slightly rougher surface, which results in some extra crunchy bits. They should come out fine without it though.
1 (15.5 oz) can of chickpeas
Chickpea flour or all-purpose flour (optional)
Oil for frying
Kosher or sea salt
Hot smoked paprika
Drain chickpeas, rinse, and then drain again on a triple thickness of paper towels, patting with an additional paper towel to dry as much as possible (they probably won't get 100% dry so just do the best you can). Toss chickpeas with a spoonful of flour (optional). Heat oil in a deep pot or saucepan until it reaches 375 deg F. Fry chickpeas until they are golden brown and crunchy on the outside, but still soft on the inside, about 5 minutes. Remove chickpeas with a slotted spoon and transfer to a plate lined with paper towels to drain. Sprinkle immediately with salt and paprika to taste and toss well - Clark recommends starting with about 3/4 tsp salt and 1/8 tsp smoked paprika. I used at least 1/4 tsp paprika and will use even more next time, because the smoky flavor didn't come through as much as I wanted. Serve warm or at room temperature.
About storage: we ate the whole batch within a couple hours so I can't give you any information about longer-term storage...I suspect yours won't last long either though.
Labels:
chickpeas,
hors d'oeuvres,
party food,
quick,
snacks
Sunday, October 17, 2010
Peanut butter banana bread
I have always loved peanut butter. As a kid, I would only eat the chunky kind, and later on switched to the creamy camp, where I still am now. I even remember trying peanut butter soup on a family vacation once. Bananas, on the other hand, I never really liked until a few years ago. It turned out that all it took to change my mind was smelling bananas one morning when I was very, very hungry. I started craving them immediately that day, and still enjoy them now. It's strange how tastes can change so quickly.
Once I started eating bananas more often, I quickly discovered how good the combination of peanut butter and bananas is. So when I saw this recipe for peanut butter banana bread in the October 2010 issue of Cooking Light, I couldn't believe that I hadn't thought of it before! I knew it was going to be delicious, and it didn't disappoint. The peanut butter adds a nice nutty flavor, and the peanut pieces add good texture. Regular banana bread is good, but I think this is even better!
Obviously bananas are not local to MA, but this is one of those recipes that I wanted to post about anyway. As for modifications, I used white whole wheat flour instead of all-purpose, like I always do for quick breads. I also substituted 1/2 cup applesauce for some of the banana, since I didn't have enough banana around. It worked out really well - the bread still tasted like banana (not apple), but the banana flavor wasn't too strong. I'll probably do the same thing next time. Finally, the original recipe also included a peanut butter glaze, but I left that out - I knew the glaze wouldn't store or freeze well.
Labels:
bananas,
breakfast,
brunch,
magazine mondays,
peanut butter,
quick bread,
snacks,
whole wheat
Sunday, September 26, 2010
Grandma's hermit bars
My sister-in-law threw me a lovely bridal shower last spring. Knowing my fondness for cooking, she asked all the guests to contribute a favorite recipe, and compiled them into a little book for me. It was such a thoughtful gift! I love flipping through it, not only for the recipes, but also for the memories and connection to family and friends.
Have you ever heard of hermit bars? I tasted them for the first time a year or two ago at Andrew's grandmother's house, and I was excited that she contributed the recipe for my shower. They're kind of cakey in texture, humble and homey in spirit, and filled with raisins and spices. The flavors are perfect for fall. I'm not sure how they got their name - if you know, please share!
I didn't change much in this recipe, except to use white whole wheat flour instead of all-purpose (as usual), and a combination of brown and white sugar instead of all white. The hermits came out great - perfect for an afternoon snack (and mid-morning snack, and dessert, and breakfast...)
Labels:
bars,
dessert,
snacks,
whole wheat
Tuesday, September 7, 2010
Zucchini sweet potato bread
This is my favorite quick bread recipe, and happily, both zucchini and sweet potatoes are in season right now! I first came across this recipe on Joy the Baker, and I've modified it to use white whole wheat flour, and also cut down on the sugar, because I don't like quick breads to be too sweet. This bread is hearty, moist, and flavorful, and makes a great breakfast...or afternoon snack...or dessert. And though I wouldn't exactly call it healthy, I think wholesome is an appropriate description. Enjoy!
Labels:
4SoF favorite,
breakfast,
brunch,
quick bread,
snacks,
sweet potato,
whole wheat,
zucchini
Tuesday, August 31, 2010
Baked potato chips
I love potato chips, but we don't often keep them around (I tend to go through them a bit too fast). The other day, I was hungry for an afternoon snack and decided on a whim to try making baked potato chips with a couple of the little purple potatoes that I had bought at the market. They came out really good! I'm looking forward to trying this with sweet potatoes and maybe some other vegetables too.
Baked potato chips
Potatoes (they don't have to be purple): I'd say a medium sized potato would yield enough chips for about 2 people
Spray oil
Salt
Preheat oven to 350 deg F. Cut potatoes into paper-thin slices using a mandoline (a vegetable peeler will work in a pinch if you don't have a mandoline). Lightly coat a cookie sheet with spray oil, and arrange potato slices on sheet. Lightly spray the potatoes with oil and sprinkle with salt. Bake in preheated oven for about 15 minutes, turning cookie sheet once, or until potatoes are golden brown and crunchy.
Labels:
4SoF original,
potatoes,
quick,
snacks
Monday, July 26, 2010
Cheese straws
 This is a fun recipe to make for a party. It's not complicated, but rolling out and handling the dough is a bit tricky. I had this bookmarked from Smitten Kitchen for just over a year, and then finally made it as an hors d'oeuvre for our last dinner party. They taste like spicy Cheeze-Its and make a nice snack to enjoy with some beers.
 Cheese straws
Adapted from this recipe at Smitten Kitchen
1 1/2 cups (about 6 ounces) grated extra-sharp Cheddar cheese
4 tablespoons unsalted butter, softened and cut into 4 pieces
3/4 cup flour, plus more for dusting
1/2 teaspoon kosher salt
1/2 teaspoon crushed red pepper flakes
1 tablespoon cream
Preheat oven to 350°F. In a food processor, mix together the cheese, butter, flour, salt and red pepper in 5-second pulses until coarse crumbs form - this took about 5 pulses. Add the cream and process until the dough forms a ball, 10 seconds or so.
On a lightly floured surface, using a floured rolling pin, roll the dough into an approximately 8- by 10-inch rectangle that is 1/8-inch thick. A warning: if you do this on a hot summer day, this gets tricky. Keep flouring the rolling pin as needed and work as quickly as possible. With a sharp knife (I used a pizza cutter), cut the dough into 8-inch strips, each 1/4- to 1/3-inch wide (dipping the knife in flour very often helps with this). Carefully transfer the strips to an ungreased cookie sheet, leaving at least 1/4-inch between them. Transferring the dough is a bit tough - it's delicate and breaks if it sags too much. From my experience, it is easiest to cut a strip and transfer it immediately, rather than trying to transfer multiple strips together. I used a bench top scraper to lift half the strip and draped the other half over my hand. Anyway, even if you do break them, it doesn't really matter. They'll still bake correctly and will taste good, they'll just be shorter.
Bake the straws on the middle rack for 12 to 15 minutes, or until the ends are just barely starting to brown. I tried baking two sheets at once, and the pieces closest to the sides of the oven started to brown before the middle was done. It is probably best to do one sheet at a time and keep it in the middle. When finished, remove from the oven and set the cookie sheet on a rack to cool.
Serve at room temperature. These can be kept in the fridge for a couple days, but they were best on the first day.
Labels:
cheese,
hors d'oeuvres,
party food,
snacks
Subscribe to:
Posts (Atom)

